Sunday, February 17, 2013

Aqua Color Palette

Art Deco aqua switch plate cover
Art Deco Aqua Switch Plate Cover

There is something about aqua that makes my heart sing! It can feel wonderfully vintage or fresh and modern.

In the top switch plate, I paired a simple translucent aqua inlay with a faux black mother-of-pearl background. My grandmother had the most amazing jewelry box made from black mother-of-pearl. I thought of it immediately when I sliced into the mokume gane clay sheet and revealed the scalloped design.

The bottom plate is a more modern geometric take where I added a few orange and blue inlay pieces in an asymmetrical pattern.

Both are available at: http://www.etsy.com/shop/YoungCreative
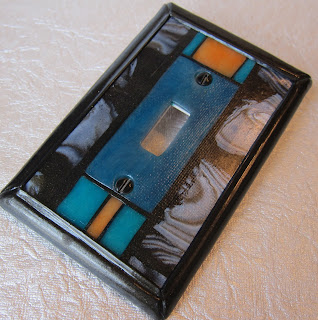

geometric switch plate
Modern Geometric Switch Plate Cover

Sunday, February 10, 2013

Angry Bird Near Cake Wreck

Angry Bird Space Cake Topper

When the request came in from my nephew to do an Angry Birds Space cake for his birthday, I have to admit that I had to do a little googling. Once I found a picture of a bird I liked, polymer seemed like the way to go to create a light-weight 3-d topper.

I had read a magazine article where an artist created doll heads by shaping a polymer sheet around a styrofoam ball so I decided to give that a try. Let's just say my first attempt didn't work out, but check out the cool texture on the broken pieces. There has to be a something cool that I can do with the shards.

For attempt two, I pulled out a glass Christmas ornament and pulled out the hanger. I shaped the bird's head feathers around the protruded part. I even added a small hook in the back to he can use the topper as a Christmas ornament later.

So what went wrong? When I shared the story in our forum for the Polymer Clay Artists Guild of Etsy, one of the women asked if I added an "exhaust vent." I had meant to add a hole at the base, but in my excitement to get it in the oven, I totally forgot. At least I was only on the base layer when it happened.

Live and learn!

Wednesday, February 6, 2013

Faux Granite Easter Egg

Faux Granite Easter Egg
When I wrote about this project last week in my post Faux techniques in polymer, I promised you a few tips on creating your own faux granite. Well here they are:

1. Create the polymer "granite" base layer. I've made some cool stone effects with tinted translucent clay and pepper flake inclusions, but in this I simply opened a packet of Premo Sculpey Granite and blended in a small amount of pearl and translucent premo to give it a nice soft feel.

2. After I covered the entire egg with the base polymer, I added accents with a flat extruded rope.

3. Add a stippled texture to the raw clay with a stiff wire brush. I also added a few "cracks" with a pointed sculpting tool.

4. Bake the granite layer.

5. Add depth to the granite layer with acrylic paint. Brush black or dark umber paint onto small sections making sure to get it into the crevices. Wipe it away immediately with a damp cloth leaving only a small amount in the recessed areas.

6. I finished the project off by adding a flowered vine and rebaking the egg.

Of course if you like this project, but don't feel like making your own, this one is for sale:
https://www.etsy.com/listing/121773536/easter-egg-victorian-gothic-decor-faux

Friday, February 1, 2013

Faux techniques in polymer

Faux Granite Decorative Egg by Marie Young Creative
Faux Granite Decorative Egg

Faux treatments are fun in polymer. So many options! That's why it made a great theme in this month's Polymer Clay Artists Guild of Etsy challenge.

Faux Granite
My entry features a faux granite treatment applied to a real chicken egg. I was going for a weathered granite, the kind that looks like it had been outside for ages. Stop back later in the week and I'll give you a few tips on creating this treatment.

Vote and Win
In the meantime head over to the PCAGOE challenge blog and vote for your favorites. Three lucky votes will win a mini shopping spree in one of our sponsor shops. Voting is open Feb. 1-7.


recomendations

share icons