Showing posts with label photography. Show all posts

Tuesday, July 17, 2012

Photography: Preserving the Fruits of Summer

Fruit Photography

Celebrate the taste of summer all year long.

Expect the unexpected in your photo shoot! Who knew Lucy was a fan of peaches?

Each summer, Mother Nature rewards those of us who have survived a long snowy winter with a host of amazing local fruits; raspberries, blackberries, and the lesser known gooseberry. And while we focus on their taste, they are quite incredible in their beauty as oh-so-temporary art objects.  So before you slice, dice, puree, or just pop them in your mouth, why don't you capture that beauty to remember during the colder months.

Tips for Fruit Photography


1. Get close: Use the macro setting and get in close to capture the most detail. Take lots of photos at different angles.
2. Fresh or prepared: Raw fruit is gorgeous, but your favorite recipe may be a work of art too.
3. Lighting: Morning and evening light work well. Indirect light from a window is also good. Bright light will wash out the detail. And remember: no flash!
4. Get it wet: Freshly washed fruits has lots of water beads to catch the light. Mouthwatering!

photo of a wet peach taken in the light of the kitchen skylight about 5 p.m.


Need a little inspiration?

There is a great inspiration gallery at BetterPhoto.com that you might want to check out. This site has seven full pages of clever fruit and vegetable photos by various photographers.

Art from Magazines

If taking photos isn't your thing, you can still have some great fruit photography in your home. These pieces are framed covers from Gourmet magazine. Gourmet has such delicious photos. The oranges and purples in these ones play perfectly against the dreamsicle and lilac color scheme in my dining room and adjoining living room  

Share your summer photos.

Do you have a great example of some tasty fruit photography or other photography that captures the essence of summer?

Saturday, February 25, 2012

Radiance

"Radiance" Etsy Treasury
When you have a shop on Etsy sometimes your work is selected to be in treasury. If you belong to any of the Esty teams, your work probably appears in lots of treasuries. I have been blessed to be part of several teams (Polymer Clay Artists Guild of Etsy and Etsylvanians) that actively promote my work.

While I appreciate being part of a supportive team family, I must admit there is something exciting about being featured in a "stranger" treasury. And when the excitement of a "stranger" treasury is coupled with a truly stunning treasury design, the moment is a magical one for me.  This is one of those magical moments.

My celestial earring appeared in  "Radiance,"  a treasury created by Dan and Heather of Conceptions3D. They make "decorative concrete gems for the home and office" not to mentions beautifully artistic treasuries.

The treasuries they have curated include some of the most amazing product photography I have seen on Etsy. You can see more of their collections here: http://www.etsy.com/people/Conceptions3D/treasury

Before I let you go to take in some gorgeous eye candy, I thought I would share some of their stunning decorative concrete pieces.


Saturday, February 26, 2011

Canon PowerShot S95

Canon PowerShot S95Test Shot
The Canon PowerShot S95: Great Low-light, Close-Up Camera
My new camera, a Canon PowerShot S95, just arrived. It is a birthday present from my husband, but there was no way I was going to wait a whole week to try it out.

Good for Product Shots
With my old point-and-shoot, I could take 30+ shots to get a passable product shot if I didn't have good outdoor shooting conditions. If I tried to shoot at night indoors, even with a lightbox, I could forget it!

I knew it was time to step up to a better camera, yet skill-wise, I'm not ready for a DSLR, so I've been exploring advanced compact digital cameras.  These cameras function as point-and shoots, but they also have more manual features to let you grow your skills.

I was looking for something that would do a better job with my product shots--something that could take good close-up photos in low-light conditions. The Canon PowerShot S95 does just that. I captured the photos of apples in a glass bowl in my kitchen last night with only the overhead light on. I used the "Auto" setting and got it on the first try. What you see is totally unedited.


Zoom/Low-Light Setting
For this shot of my cat Tucker, I used the low-light setting, and zoomed in on him so I wouldn't distract him. It is also totally unedited. There is no way I could get this picture with my old camera. I would have to choose between a no-flash blurry shot with accurate color or a washed out flash shot with serious cat red-eye.

Big Things in a Small Package
I love a small camera that doesn't bog me down when traveling, but I figured I would have to get something bigger to get better photos. So NOT TRUE! This camera is SHOCKINGLY SMALL.If you have large hands that might be a drawback, but once I got used to the feel, I found it very comfortable to hold.

Bonus Features
Right now I am only playing around with the automatic functions. This camera has a lot of manual features and is considered a bridge camera between basic compact digital cameras and more-advanced DSLRs. The other feature I really like is that you can save shots as JPEGs or RAW files. JPEGs loose image-quality which can be a real problem if you want to use large versions of your photos in printed pieces. I edit a magazine at Saint Francis University, and I would like to have the option to have RAW files for that.

Cost
Yes, it is cute and small. No, it is not cheap. This is a high-quality camera, and the price reflects that. It ranges from $369 to $399.

Giving Credit
I have to give credit where credit is due. The camera search overwhelmed me so I turned to my two favorite photographer friends Trish and Tara, for advice. They are both advanced users who prefer the artistic creativity a true DSLR provides, but they understood that I had different needs and sent me down this path.

Trish's husband Jay was looking to trade his advanced camera for something more portable that he would use more often, and he had done a lot of research on the topic. He a seriously analytical banker guy so I knew the research would be thorough. Thank you guys for taking the stress away from the camera buying process!

Sunday, December 26, 2010

Christmas Photos

We had a wonderful Christmas day celebration at my sister's house. It was a great opportunity to practice some of the tips Trish Hummer shared in her guest post series: Shooting Better People Pictures.

Rob, me, and my beautiful niece

 We "stacked" our group photo.


My niece with her DS
I focused on faces.


My nephew as Boba Fett
 I made head-to-toe shots count. The socks are authentic Boba Fett!


Rob and Greg inspecting the blasters
 And I shot when they weren't looking. I have a whole series of shots with Rob and my brother-in-law Greg, making sure the Clone Trooper blasters were "ready" for the kids to use.

Sunday, December 19, 2010

Shooting Better People Pictures (Part 7)

Today's post brings a close to this week-long photography series: Shooting Better People Pictures by Trish Hummer of Everyday Images by Trish. 
Part 1:  Digital photography basics and great full-body shots
Part 2:  Focus on faces and shoot when they're not looking
Part 3:  Being silly and letting kids be kids
Part 4:  Capturing relationships and shooting groups
Part 5:  Doing what they love and going faceless
Part 6: Shoot multiples of expressions
Part: 7: Great lighting, the unexpected, and indoor sports
Shooting Better People Pictures (Part 7)

Tip 12: Take advantage of great lighting
When you see great lighting, run for your camera and start shooting.


Tip 13: Embrace the unexpected
If something unexpected happens, just keep shooting. The photo that you didn't intend to take often ends up being a keeper.


Tip 14: Keep your friends close
When taking pictures in interesting settings, try keeping your subject close to the camera instead of off at a distance.


Tip: 15: Find the story in the sport
Indoor sports are tough, especially if you don't have a big fancy lens. Leave the action shots to the pros, and focus on the images between (and around) the action. That's where the story lies.


Saturday, December 18, 2010

Shooting Better People Pictures (Part 6)


This is Part 6 of a week-long photography series Shooting Better People Pictures by Trish Hummer of Everyday Images by Trish. 
Part 1:  Digital photography basics and great full-body shots
Part 2:  Focus on faces and shoot when they're not looking
Part 3:  Being silly and letting kids be kids
Part 4:  Capturing relationships and shooting groups
Part 5:  Doing what they love and going faceless
Part 6: Shoot multiples of expressions
Part: 7: Great lighting, the unexpected, and indoor sports
Shooting Better People Pictures (Part 6)

Tip 10: Shoot Multiples
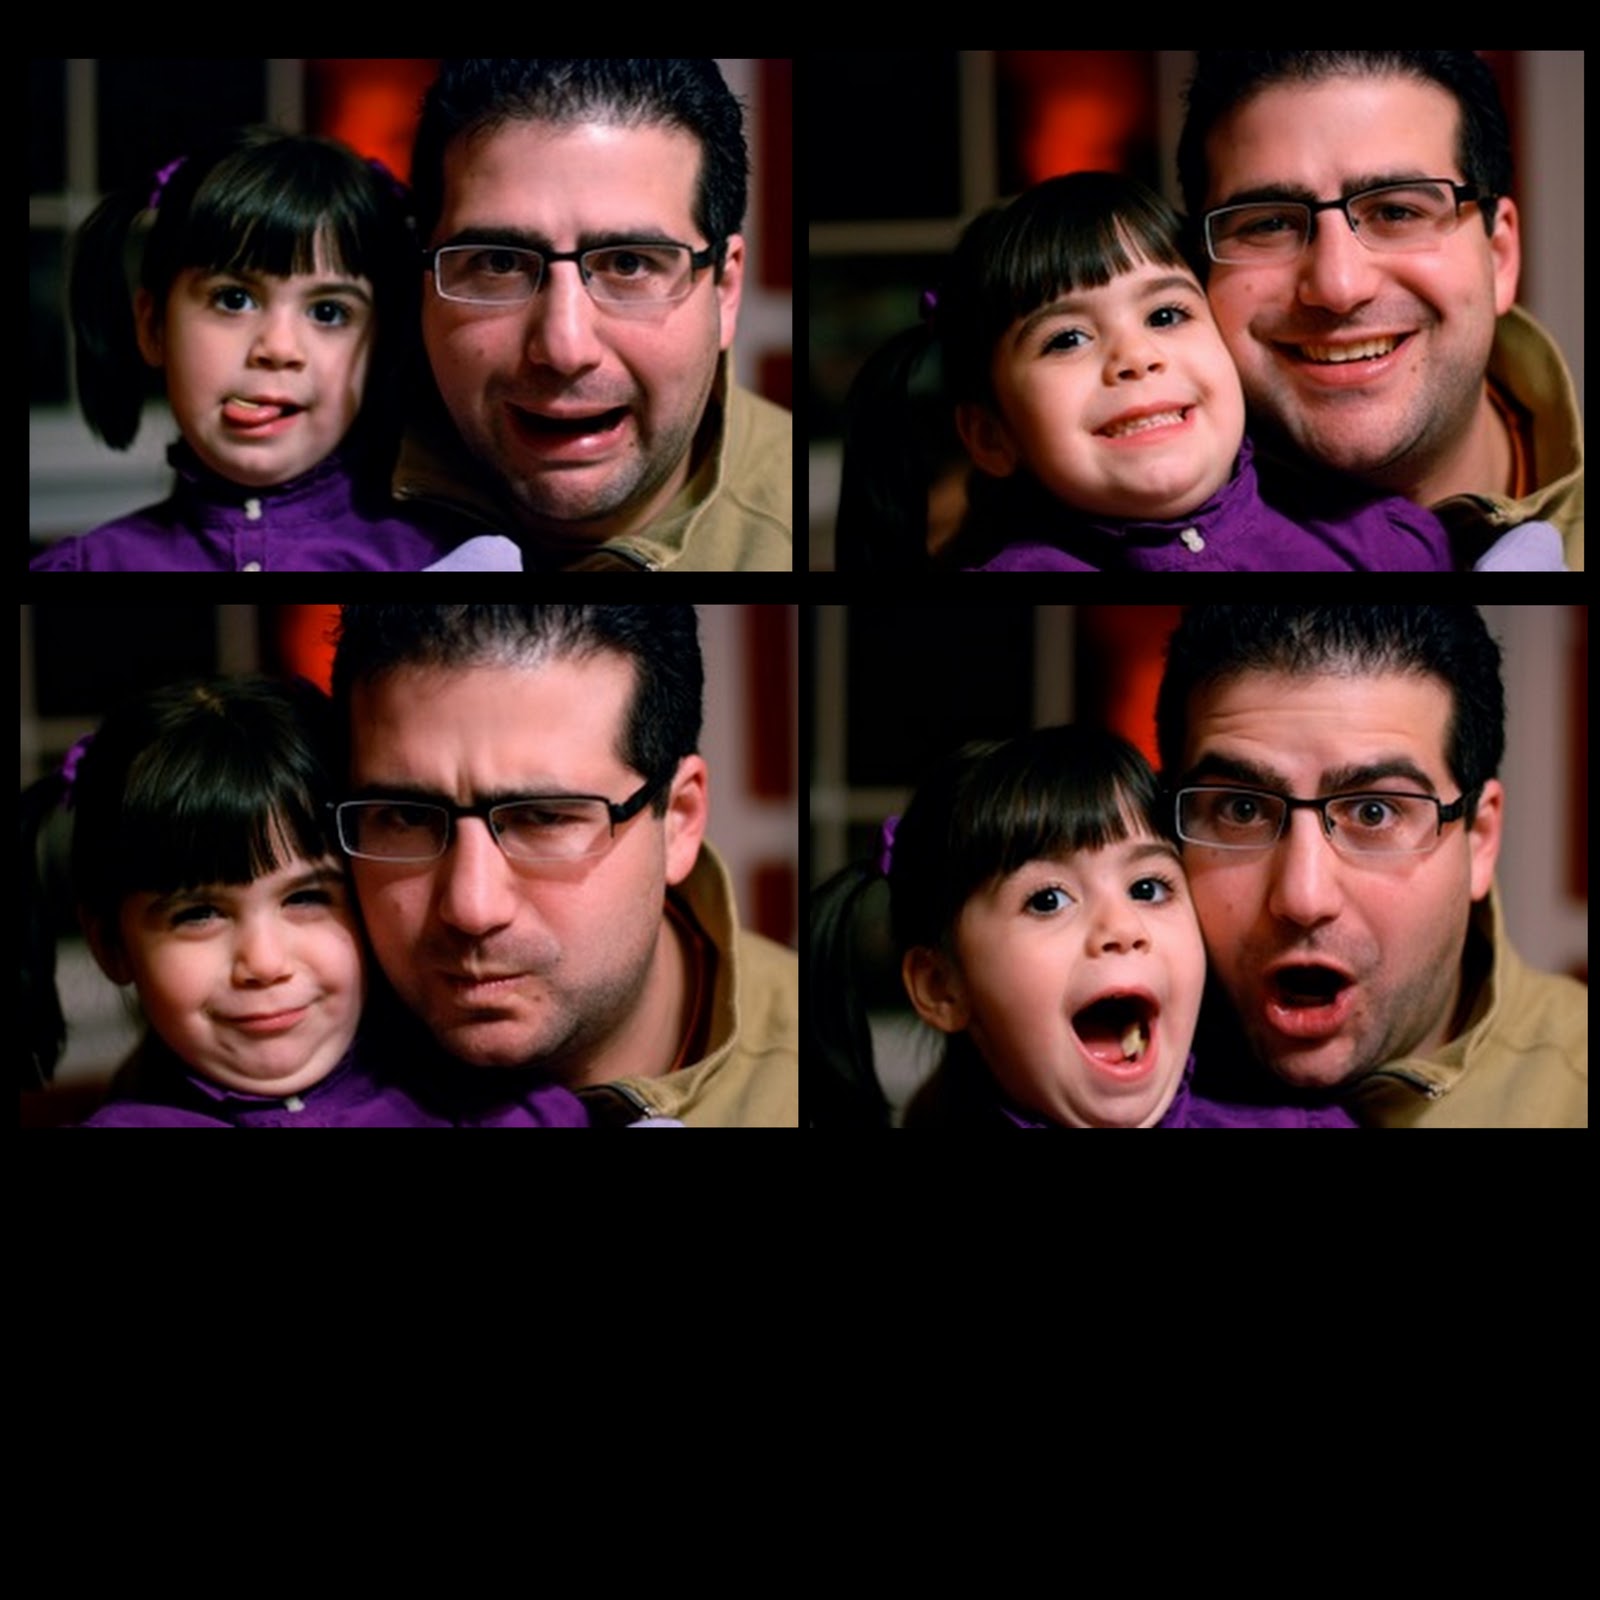
Shoot multiples with changes in expression. These never disappoint me. With little ones, I might ask them to show me what they look like when they're happy, when they're sad, when they're scared, when they're surprised, etc. They love this game and I think the resulting images look great framed as a series.


Tip 11: Shoot Funny Faces

Or shoot multiples with each person giving you their best funny face.

Friday, December 17, 2010

Shooting Better People Pictures (Part 5)


This is Part 5 of a week-long photography series Shooting Better People Pictures by Trish Hummer of Everyday Images by Trish.

Part 1:  Digital photography basics and great full-body shots
Part 2:  Focus on faces and shoot when they're not looking
Part 3:  Being silly and letting kids be kids
Part 4:  Capturing relationships and shooting groups
Part 5:  Doing what they love and going faceless
Part 6: Shoot multiples of expressions
Part: 7: Great lighting, the unexpected, and indoor sports

Shooting Better People Pictures (Part 5)

Tip 8: Capture people doing what they love.
Shoot people doing what they love and you'll always get good pictures of them, whether they are focused on the task at hand or showing you what they're up to.


Tip 9: Faces aren't always required.
As much as I've emphasized faces, I should point out that you don't always need to see their faces for it to be a good picture and to instantly be relevant to the subject. Some of these images might not hold much significance to an unrelated observer, but to those who know and love the subject, they can have great meaning.


Thursday, December 16, 2010

Shooting Better People Pictures (Part 4)


This is Part 4 of a week-long photography series Shooting Better People Pictures by Trish Hummer of Everyday Images by Trish. 
Part 1:  Digital photography basics and great full-body shots
Part 2:  Focus on faces and shoot when they're not looking
Part 3:  Being silly and letting kids be kids
Part 4:  Capturing relationships and shooting groups
Part 5:  Doing what they love and going faceless
Part 6: Shoot multiples of expressions
Part: 7: Great lighting, the unexpected, and indoor sports

Shooting Better People Pictures (Part 4)

Tip 6: Capture Relationships
Look for pictures that reveal something about people's relationships. It is very helpful to take picture of people relating to one another so that you can avoid the awkwardness of relating to the camera. The manner in which people interact is often evident in their pictures together.


Tip 7: Shooting groups
When shooting groups of people, avoid having people stand shoulder to shoulder. Try to stack them so that you fill more of the frame with their faces. Or ask them to do something other than just standing and smiling. When shooting large groups, look for smaller subsets within the group. (This works great whether while shooting or in the cropping stage.)


Have examples of your own to show? Leave a comment with a link or share them at the Creative Sprinkle Flickr Pool.

Wednesday, December 15, 2010

Shooting Better People Pictures (Part 3)

This is Part 3 of a week-long photography series Shooting Better People Pictures by Trish Hummer of Everyday Images by Trish. 

Part 1:  Digital photography basics and great full-body shots
Part 2:  Focus on faces and shoot when they're not looking
Part 3:  Being silly and letting kids be kids
Part 4:  Capturing relationships and shooting groups
Part 5:  Doing what they love and going faceless
Part 6: Shoot multiples of expressions
Part: 7: Great lighting, the unexpected, and indoor sports
Shooting Better People Pictures (Part 3)

Tip 4: Capture Fun
Catch people having fun or being silly, whether close up or far away.


Tip 5: Let Kids be Kids
Catch kids being kids. It's so much easier than trying to get them to pretend they are models.


Have examples of your own to show? Leave a comment with a link or share them at the Creative Sprinkle Flickr Pool.

Tuesday, December 14, 2010

Shooting Better People Pictures (Part 2)

This is Part 2 of a week-long photography series Shooting Better People Pictures by Trish Hummer of Everyday Images by Trish.  
Part 1:  Digital photography basics and great full-body shots
Part 2:  Focus on faces and shoot when they're not looking
Part 3:  Being silly and letting kids be kids
Part 4:  Capturing relationships and shooting groups
Part 5:  Doing what they love and going faceless
Part 6: Shoot multiples of expressions
Part: 7: Great lighting, the unexpected, and indoor sports

Shooting Better People Pictures (Part 2)

Tip 2: Focus on Faces
Faces are what people respond to best but you don't have to show the whole head. I will often crop off the top of a person's head because the top of their head isn't important to the picture. Everyone knows we have dome-shaped heads that are, for the fortunate, covered with hair. It's their faces that draw us in, especially the eyes.


When shooting faces, make sure they're not just giving you their "camera" smile. A good way to tell if the smile is genuine is to look at their eyes. For the picture to ring true, the emotion shown in the eyes should match the emotion shown in the smile. (I'll often point out to people that they are just smiling with their mouth and not their eyes, and they get it. If they don't, I'll demonstrate.) Don't be chagrined, though, if you are taking pictures of kids between the ages of 3 and 6 years. You need to catch these kids smiling if you don't want the typical "Say, 'CHEESE!'" smile.


Tip 3: Shoot when they're not looking.
Shoot when they're not looking (but be respectful of their privacy and don't shoot anything questionable.) These shots tend to ring most true in terms of the subject's personality and you can catch glimpses of personalities and relationships.


For more great tips, check out Part 3 tomorrow with advice on being silly and letting kids be kids.

Monday, December 13, 2010

Shooting Better People Pictures

A week-long photography series designed to help you tell better stories through your photography.
by Trish Hummer of Everyday Images by Trish
Part 1:  Digital photography basics and great full-body shots
Part 2:  Focus on faces and shoot when they're not looking
Part 3:  Being silly and letting kids be kids
Part 4:  Capturing relationships and shooting groups
Part 5:  Doing what they love and going faceless
Part 6: Shoot multiples of expressions
Part: 7: Great lighting, the unexpected, and indoor sports

Welcome to Part 1
Marie Young of Creative Sprinkle invited me to write a guest blog about taking pictures of people because it's what I love to do best. With the holidays upon us, I thought it might be the right time to offer some pointers for those hoping to capture some memories in the coming weeks.

Let me preface this by stating that I am not a professional photographer. If I were an athlete, I am what you would consider a minor-league player. I sometimes get paid to play and I dream of playing in the bigs but, for now, I'm in it for the love of the game. So the advice below is not about ISO, F-stops or aperture. It's about people.

Also, remember THERE ARE NO RULES. These are just some tips to get you started. Once you get a better sense of what you like, you will develop your own style.

Some general comments about digital photography :

It's not all about the camera. I am fortunate to be able to shoot with a really nice camera with some awesome lenses. That definitely gives me an advantage. But some of my favorite pictures have been taken with a little point-and-shoot or the camera on my cell phone. This is about doing the best with what you've got.

Shoot WAY more photos than you think you need. In this digital age, there is no reason not to. The only thing it will cost you is time in editing, but editing time is also learning time. The more you shoot, the quicker you will learn what works for you and what doesn't.


Download and review your images within 48 hours of shooting. I almost always edit the same day because I'm excited to see my results. This also helps me avoid a backlog which can become daunting if you shoot as much as I do.


Learn how to edit your photos. I cannot emphasize this enough. I took a class once in which the instructor pointed out that, with digital photography, what you shoot accounts for only part of the result; the other important part is what you do with an image once you get it out of your camera and into your computer. There are tons of software programs out there. Some are very sophisticated and work best for hardcore professionals. But learning just a few editing basics (cropping, straightening, red-eye reduction, and exposure compensation) in programs like iPhoto or Photoshop Elements can help you turn a mediocre photo into a really nice photo. Once you get the hang of it, you can edit hundreds of images in less time than you would expect.


Share your images. People love to look at pictures and with sharing sites like Shutterfly, Snapfish, and Flickr, you no longer have to order lots of expensive prints to share your photos with friends and family anywhere in the world. You will also find that you'll take lots of images that you might not consider "print worthy" but that are still fun to share. When sharing electronically, though, be courteous to your audience and weed out the truly bad photos and make sure you rotate any photos that need it in order to be right side up when viewed.

Now for the people part.

First of all, I believe you have to like people to get good pictures of them.  And you need them to stop thinking about the camera you're pointing at them.  Best way to do that is to engage them.  Talk to them.  Get them laughing.  With little ones, take their picture and then show them the result.  And don't be annoyed when they ask to see them over and over again.  Isn't that why we take them?  It will also help them see how to be a better subject.

Generally, this biggest piece of advice I give to friends who ask how to take better pictures of people is to tell them the get closer to their subjects.  Closer than may seem comfortable.  I'm not suggesting you get into the face of your intended target, but definitely get cozy with the zoom feature on your camera.  You can also get "closer" by cropping the images once you get them into your computer.

Tip 1: If it's head-to-toe, make it count.
I seldom take people pictures that show people from head-to-toe.  When I do, there better be something interesting going on from top to bottom. It's also more important in these images to pay a little closer attention to what's going on in the background.  Sometimes a simple change of angle will improve things greatly.


Sunday, July 18, 2010

Photography: The Art of Everyday Objects


Shooting Still Life Photos

You don’t need to be a professional photographer with a high-end camera to create great art for your home.You just need to see the possibilities in the everyday.

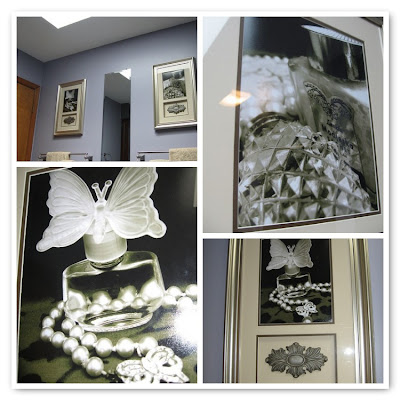
One of my favorite ways to turn photography into art is by creating still-life vignettes of my favorite things. These black and white photos are a great example. The pair grace my newly remodeled 1940s Hollywood-inspired bathroom. The photos feature a Larkin's powder jar that belonged to my great-grandma and an antique cut-glass hand-held mirror in one, and a perfume bottle and my mom's butterfly pearl necklace in the other.

Behind the Scenes of a Photo Shoot

I’d love to say that I saw this exact shot in my head from the beginning; I didn’t. All I knew was that I had a lot of “pretty stuff” that fit the bathroom’s theme. I gathered up the stuff, things like perfume bottles and jewelry, and headed outside with them. I find I have better success in natural light when I don’t need my flash.

I created a backdrop using a velvet wrap draped over some boards. Then I started arranging items and shooting. I took LOTS of photos. Close ups using the “macro” stetting. High angles. Low angles. I added items. I took items away. Then I headed inside and started cropping.

To be honest the original photos weren’t all that exciting. The colors of the different items were competing with each other, and the compositions were kind of busy. To deal with the composition problems, I started experimenting with cropping to bring out a focal point. Then I converted the images to black and white.

Try It Yourself

To start, think about the room where you want to add a photograph. Think about the room’s purpose, its mood, and its color scheme.

Gather objects that coordinate with the room. Some of those objects may already be in the room. Others may family heirlooms tucked away in the attic. Think broadly. Fruits, vegetables, buttons, fabric, anything can become your subject matter.

At this point, don’t get too stressed about what the final image will look like. Just start grabbing things. As you start to arrange the pieces, you’ll see what works and what doesn’t. Sometimes a single item is much more powerful than a grouping. Play with that idea as well.

If you choose items that share a common color scheme, you can create a photo that evokes the mood of that color. Unfortunately, sometimes when you put things together, the colors clash. That’s where converting photos to black and white can be a life saver.

Black and white photography doesn’t need to be reserved for vintage looks. It is can take on a very modern look in the right context.

Thought-starters

Here are a couple of ideas that you might want to try.

Nursery: black and white photography of toys or stuffed animals

Kitchen: heirloom dishes, your favorite wine bottle coupled with wine glasses and grapes, a cake plate with your latest creation on it

Bathroom: sensuous lipstick shots, perfume bottles, rubber ducky floating in bubbles

Bedroom: slippers, lingerie, a nightcap on the bedside table


Inspiration Gallery

I asked some of my favorite amateur photographers to share their still-life photos in an inspiration gallery that I just created. The gallery is filled with clever examples of still-life photos that will get your creative juices flowing: mouthwatering food, cat-munched toilet paper rolls, sports equipment.

The Creative Sprinkle Inspiration Gallery is open for you gain inspiration, or you can add your own photos to inspire others.


What still life photos have you incorporated into your home?

recomendations

share icons